


Rookie Year: The Engineering Intern’s Toolbox (Part 5)
A Series of Technical Blogs for Engineering Interns & Entry-Level Engineers
Taps are tools that most engineers will come across at some point in their careers. Taps bridge multiple industries and are used practically everywhere. It doesn’t matter if you’re working in a machine shop, repairing a thread at home, or creating one from scratch for a prototype; you’ll be expected to know how they work. Taps are so common that countless websites give instructions on how to tap a hole. But we are going to go one step further to make sure you don’t look like a rookie.
+ What is a tap?
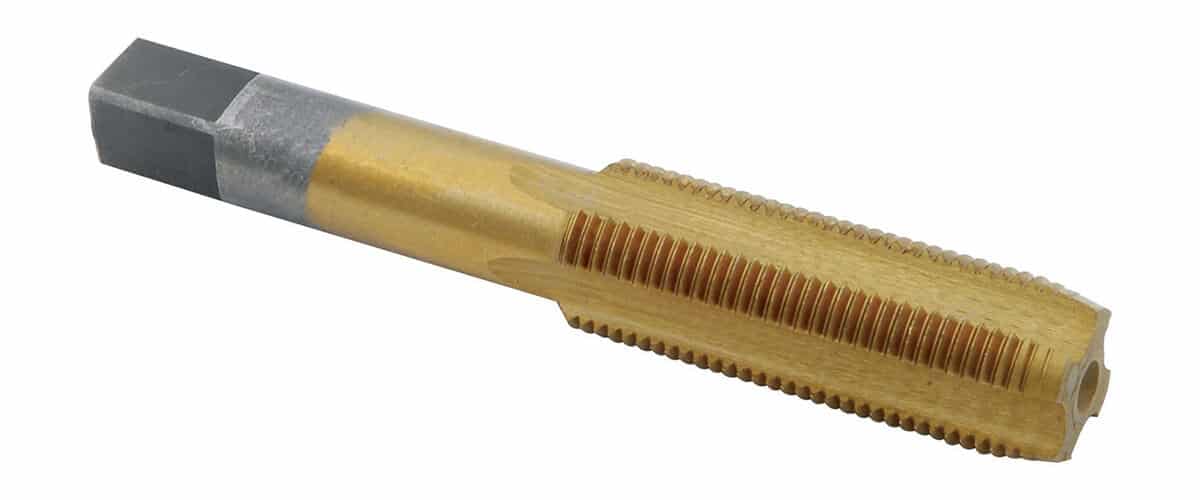
A tap is a tool used to cut a threaded hole inside a piece of material. There are two types of threads: internal female threads and external male threads. Internal and external threads are combined to fasten pieces of work together. A hand tap, Figure 2, creates internal female threads within a piece of material. These internal threads act in place of a nut. External male threads are created using a different device called a die. Dies are used to add male threads to things like studs, bars, or pipes.
+ How do taps work?
A conventional hand tap works as a cutting tool by removing material from a work piece. This is done using sharp teeth. The tap is spun down a hole within a work piece. The hole is referred to as a pilot or tap hole and is sized according to the desired thread and the material to be tapped. As the tap scrapes along the sides of the hole, it cuts away a spiraling ramp making the female thread. A tap can be used to create a thread for the first time or it can be run into an already tapped hole to help repair damaged threads.
When a tap is used it only cuts in one direction, typically clockwise for standard threads. As the tap is spun it will progressively work its way deeper into the hole as it cuts new threads. If the tap is spun counter-clockwise it will back itself out of the hole, similarly to backing out a threaded fastener.
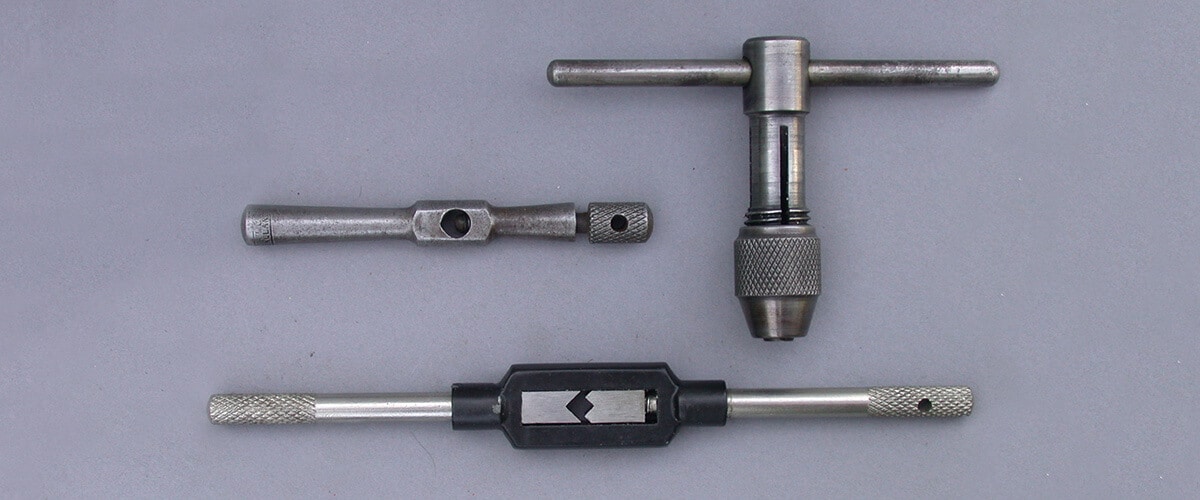
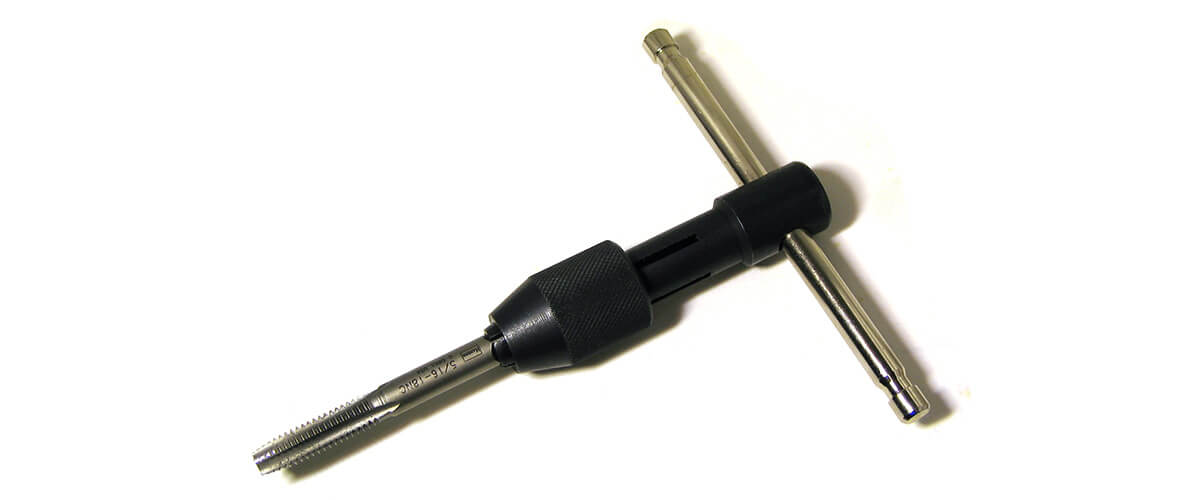
Hand taps are usually paired with a tap wrench, see Figure 3. This allows a user to align the tap with the pilot hole and allows the user to spin the tap in both directions. There are a variety of wrench styles and they are sized to fit a range of taps. They consist of a clamp which secures the tap and an elongated handle to give the user leverage.
+ Anatomy of a tap.

A tap is primarily composed of a shank of steel. The cutting or thread length contains the sharp teeth which cuts the threads. As the teeth dig into the walls of the hole the material is removed as a curled chip. Within the thread length are a series of flutes or cut-outs which serve as areas for cut away material to collect. On the opposite side of the tap the shank is formed into a square. This is used to fit inside wrenches and holders in order to spin the tap while in use.
+ Types of common taps.
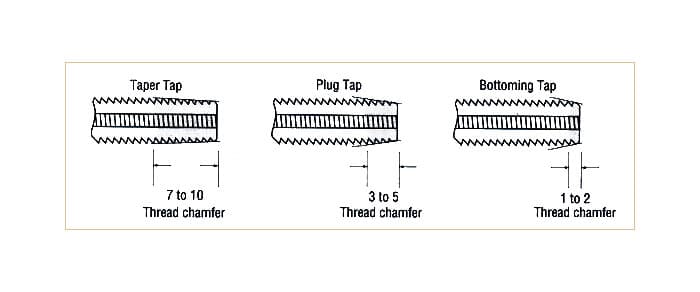
Taps contain a chamfer at the beginning of their thread length. The primary purpose of the chamfer is to allow the first few cutting teeth to make progressively deeper cuts. This reduces the force the user requires in order to spin the tap as well as reducing wear on the tool. It also acts to help align the tap within its pilot hole. The other purpose of the chamfer is that it can affect the utility of the tap. There are three styles:
Taper Tap: Taps with a very shallow chamfer are referred to as taper taps. The shallow taper makes starting a tap easier as the shank is easier to align within a pilot hole. This high taper also means that the first few cutting teeth take very shallow cuts to reduce the force required to spin the tap and make the tap easier to start. The downside is that the first 7 to 10 threads are not fully formed, meaning they cannot tap to the bottom of a blind hole. They are best used for cutting threads for the very first time.
Plug Tap: When the chamfer is shallow enough to only affect the first 3 to 5 threads it is referred to as a plug tap. The shallower chamfer makes them harder to start a new thread. Likewise, they require more force to spin when cutting a thread for the first time. They are ideal for repairing threads that already exist or tapping a hole deeper than a taper tap is capable of. The best use for a plug tap is threading a thru hole because the tap does not need to be run as deeply as a taper to achieve the same results.
Bottoming Tap: When the lead in chamfer is smaller than 2 threads it is referred to as a bottoming tap. This tap is capable of cutting threads all the way to the bottom of a blind hole. Its lack of chamfer makes them very difficult to start a new thread and keep it aligned with the hole. Bottoming taps are best used after a taper or plug tap has been used to cut the initial thread.
+ How to tap a hole.
Step 1: Identify the thread and tap you require.
This step sounds easy but it often gets done incorrectly especially when repairing a thread. When a thread already exists, use a thread gage to determine the thread you require. When creating a new thread, reference a tap chart to select the tap and tap drill you require for your desired thread. Remember that the lead in chamfer of the tap requires a little extra space to fully form a thread. Therefore, when predrilling the pilot hole make sure to drill the hole slightly deeper than the threads you require.
Step 2: Load the tap into the wrench.
Typical tap wrenches have a square cut out for the rear of the tap. This cut out has a way to clamp down tight on the tap to prevent it from falling out or spinning. When loading the tap into the wrench make sure it is perpendicular to the handle and loaded firmly so that you do not strip the square head of the tap. Select a tap wrench which is sized for the tap you have selected.
Step 3: Lubricate the hole.
When tapping a hole, the cutter requires cutting fluid. Fluid lubricates the tap as it spins within the hole as well as washes away chips so the tap does not get stuck. Both of these factors make spinning the tap easier as well as prevent breakage. It is best to select a fluid based on the material to be tapped. General purpose cutting fluids exist such as Tap Magic or Rapid Tap. Usually it is best to use a material-specific version of these products based on the material you are tapping. In a pinch, kerosene works best for aluminum, mineral oil for alloy steel, and Castrol Moly-Dee works for stainless steel. Plastics typically do not require any cutting fluids.
Step 4: Align the tap straight with the hole.
The number one reason why people break taps is misalignment. You need to start the tap in line with the drilled hole. If the axis between the hole and the tap are misaligned the tap will jam inside the hole. If the tap is misaligned the chances of breaking the tap inside the hole goes up exponentially. Do not trust the surface that the hole was drilled in and base your alignment off the piloted hole. Change your perspective and view from different angles to check before starting. Don’t be afraid to stop during the tap to recheck.
Step 5: Cut the thread.
Twist-twist-reverse…this is a good rhythm for beginners. Spin the tap clockwise a quarter turn, spin the tap again, and then reverse the tap up to a quarter turn. While spinning the tap clockwise you will be cutting new threads and making the tap go deeper into the hole. A quarter turn back is used to help unjam any chips that are forming inside the cutter. This quarter turn backs cut material into the flutes and clears the way for the cutting teeth.
If the tap is too difficult to turn: STOP BEFORE CONTINUING. Typically, difficult to spin taps are caused by one of three issues. First, the tap could be misaligned. This means that you are not going deeper into the hole and are simply going to turn the tap until it breaks. Second, you have reached the bottom of the hole and you will break the tap if you continue. Third, your tap is too dull for the material you are cutting and the chances of breaking the tap increase.
If you find it difficult to spin more than a quarter turn at a time, then stop and inspect your set up. Do not be afraid to back the tap out and figure out the problem. Breaking a tap inside a hole causes a very difficult problem… think stripped screw but on a much worse scale. While spinning the tap feel for tension and/ or resistance coming from the tap. This will indicate problems forming before breaking a tap.
Step 6: Remove the tap and flush with air or fluid.
Once you have finished tapping to the depth that you require, remove the tap. You will then need to remove any little bits of material that the tapped hole has created. This can be done by rinsing the hole with compressed air or a thin fluid such as WD-30.
Now you are armed and ready to tap a hole. Just remember that even pros break taps… the difference is how often they break one.
Written By: Sean Derrick – Product Development Engineer |
Sean has a B.S. in Engineering Design and a M.S. in Manufacturing Engineering from Western Michigan University. He has over 7 years of product development experience in a variety of industries ranging from medical, automotive, furniture, consumer products, and defense. Sean enjoys hiking, mountaineering, skiing, movies, and is pursuing a Ph.D in his free time.
Thanks for making it clear that you should know how a thread works whether you are at home or in a machine shop. It makes sense because you want to know as much as possible whether it is a hobby or a job. You can never know too much about one topic.